 All right, I managed to scrounge some time to fill you in on my final day at Kublacon including the final Skondia Battle. If you would like to read about the first two days at the con go here.
 My day started early Sunday. Eric and I carried the four pieces of the 5’ X 8’ game board, the trees, buildings, roads, mechs, tanks, etc from the parking garage to the miniatures room of the con. I was given a great spot right in the middle of the miniatures room and right as you entered, so I had an enormous amount of foot traffic walking past the game and a lot of positive feed back. I finished setting up just in time for my start time, so I took roll. Unfortunately, I had to turn a few people away—I really wanted to keep the game to eight people. Just after taking roll and approving the eighth player, the first guy on my list, who was a no show, showed up one minute late. I felt bad, but I had to turn him away too because I allowed a group of three guys to bring in their buddy who was further on the list already. I hope he found another game to play. Anyway, I got on with the game.
Turn1:
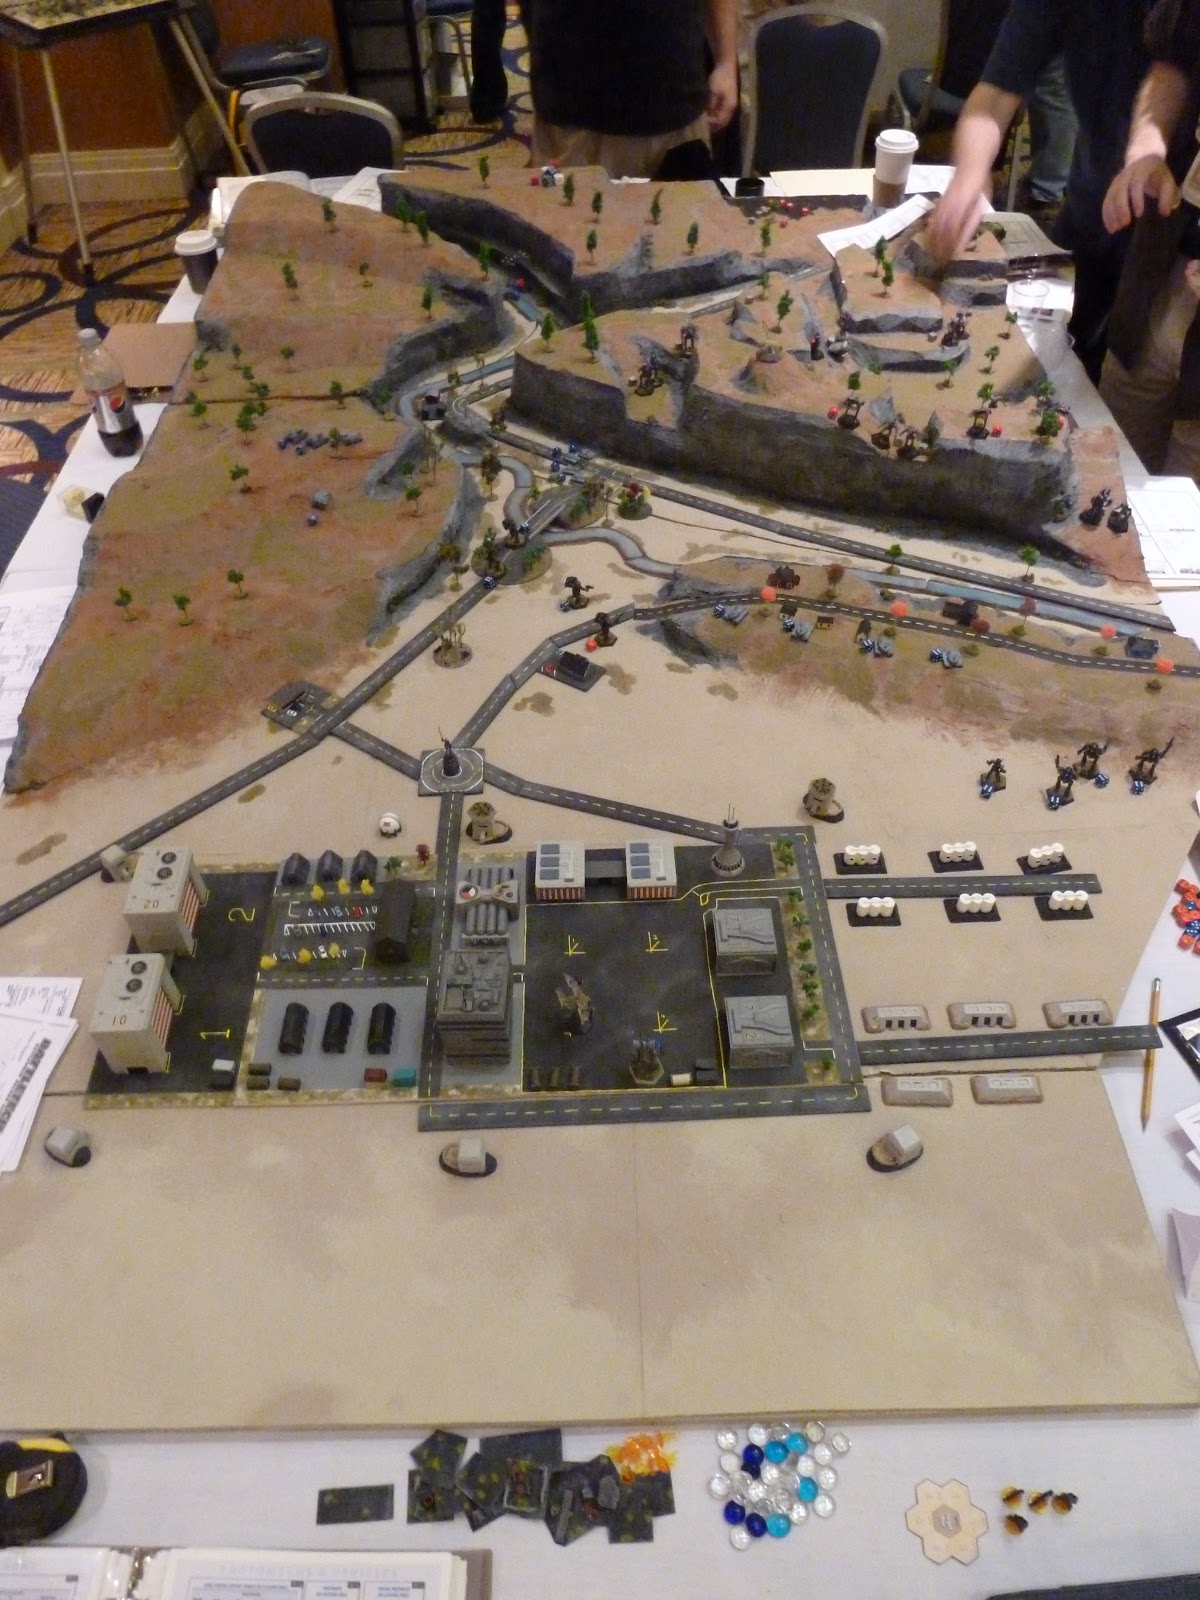
 Right from the get go, Draconis Combine (Kurita) players elected to bring in their Battalion Command Lance gambling that the large bump in long range firepower was worth giving the Lyran Commonwealth (Steiner) players five points from the start. Beginning in the North (top of the large overhead photos) the DC units rushed full speed in mass on the LC’s right flank. The only exception being the Battalion Command Lance which had to start in the river canyon slogging their way toward the action. The LC provided a static defense and elected not to move. They had split their units into two sectors—right flank on a small hill just south of the river and left flank on the bluffs overlooking the main highway and the river. The right flank was comprised of a lance of Goblin Tanks, one lance of training mechs, and two Warrior helicopters modified with LRMs rather than auto canons. While the left flank was comprised of a lace of Scorpion Tanks, two Demolishers, two Manticores, and a lance of training mechs. The only exceptions were three platoons of infantry scattered about and a Zeus piloted by the Skondia Militia commander who hung back near the aircraft hangers in the rear.
 You can see the complete force count here and the victory conditions here.
Turn 2:

On Turn two, the 14th Legion of Vega; 3rd Battalion, Charlie Company continued to rush forward on the LC’s right flank while the Battalion Command Lance (BCL) emerged from the river canyon on to highway 189. Just as they emerged from the canyon, a lance of Scorpions rounded the corner and began firing into them with multiple hits which were the first hits of the game. Meanwhile, the rest of the LC defenders stood their ground as the first DC artillery barrage pinpointed the bridge in the center of the board to no effect beyond damaging the bridge and clearing some trees.


Turn 3:
 Turn three is largely uneventful as the LC’s Scorpion Lance continues to fire into the rear of the BCL as they ignore the small tanks and move northeast to join Charlie Company in the hills. Charlie Company begins bringing all fire power to bear on the communications tower—one of their primary missions. The LC continues to stand their ground waiting for the DC mechs to show themselves. Artillery again rains down causing minor damage to one of the training mechs and the side of one of the Manticores.
Turn 4:
Turn four scores one point for the DC forces as their concentrated fire power destroys the communications tower. The LC forces began to realize they are being out maneuvered and shift their mech forces right. The 2nd Ad-hoc Lance takes up a position around the bridge while the 1st Ad-hoc Lance shifts to their extreme right. The two Warrior helicopters of the Skondia Militia leapt into action seizing the initiative and attacking one of the Trebuchets of the BCL from the rear. Finally, the Scorpion Lance chooses not to pursue the BCL into the hills and falls back along the southern cliffs. The DC forces advance a little slower to allow stragglers to catch-up, but continue south. Lastly, the DC third salvo vaporizes one of homes on the ridge defended by the Goblin Lace and causing severe damage to two of their number.


 Turn 5 starts with the LC losing most of the initiative, so besides hiding their helicopters in the river canyon and turning around their Scorpions to support the Goblins on the hill, the LC forces remain static. The DC forces began to jump-jet and climb their way over the last remaining obstacle—a level four ridge. This move finally exposes them to fire but because of their movement, most of the LC's shots missed. The DC also has another round of artillery bombardment which does more minor damage to the 2nd Ad-hoc Lance and clears a lot of the heavy vegetation around the river which the LC wanted to use.
Turn 6:
 Turn 6 begins with most of Charlie Company (Support and Recon) leaping off the high ridge to within pointblank range to the Goblins on the residential hill just within medium range of the Scorpion lance which has now come around for more. A flurry of missile, laser, and auto cannons are shot. The entire 1st Ad-hoc just about goes alpha strike, but after all of that, the two Legion lances were still standing abet a little sinzged. However, the Support Lance had to pull back two mechs because of internal damage that threatened there combat effectiveness. The Griffin took internal head damage and the Vulcan took internal center torso damage from, ironically, a hidden platoon of SRM infantry which scored most of their hits on the rear center torsso. Meanwhile, 2nd Ad-hoc and the Heavy Command Tank lances tried in vain to score any real hits on the BCL as it lobbed missiles indirectly toward 2nd Ad-hoc’s command mech—a Hatchetman. Finally, The DC realized they were too closely engaged with the LC forces to fire anymore artillery at the LC's forces, so with their last two volleys they targeted the Supply Base’s Fusion Reactor scoring a hit on it as well as damaging several nearby buildings and the LC’s Command Mech.


Turn 7:
 As the first minute passes in game time, the score was DC 2 to LC 5. There were a few grumbles on the LC’s side which revolved around the DC’s side not accounting for their heat correctly and the BCL going prone stretching the rules, but I think what was happening was the LC players were frustrated by being out maneuvered. The DC’s lead elements, while not out of danger yet, were pressing very hard on the LC’s right flank and the LC seemed to feel they had to keep assets on the left flank’s ridge so as not to completely surrender the river canyon which would allow the BCL and their LRM equipped mechs access to the base. I think the LC’s hope was to kill, not just cause to retreat, as many light mechs, lead elements, as they could allowing themselves to gain more points incase the DC did manage to destroy the base.
At any rate, it got much worse for the LC on turn 7. With pressure being turned on from their right flank and needing to cool off, the 1st Ad-hoc mech lance backed off near the fuel depot as elements of the Charlie Company jumped over the Goblin tanks and targeted the fuel depot itself just as the mechs of the 1st went alpha strike again. Between the extreme heat of two rounds of full shot and the intense heat of aviation fuel slathered allover their hulls, the Chameleons of the 1st were going to shut down, but unfortunately, not before each of them failed to stop their ammo onboard from cooking off. Each of the three mechs exploded giving the DC three points and tying the game. The Commando of the 1st Ad-hoc barely survived and was so damaged, that he would have to run off board next round.
With such an upset in the game, the LC needed a break and they got one when the last salvo of artillery rounds had an errant round strike right in the middle of the lead elements of Charlie Company knocking over one mech and causing extensive damage to three other mechs, one of which had to begin retreating (Spider). Unluckily, the LC’s change in fortune was fleeting, because the other rounds destroyed one of the hangers and the Karnov AirTransport that was loading up non essential personnel so they could be whisked out of harms way. This gave the DC another point. Those were the highlights of probably the most important round. The 2nd Ad hoc and the BCL continued to exchange long range fire, Charlie Company’s Command Lance descended to the road and engaged the Scorpion Lance, and the helicopters pursued the retreating mechs of Charlie Company with little to show for their effort.

Turn 8:
 In turn 8 we see the BCL pull back because the LC Manticores were pounding the Command mech too much—no internal damage but a lot of armor damage on the Dragon, so the 2nd Ad-hoc lance advances on Charlie Companies’ Command lance supporting the Scorpions and the two remaining ,and largely immobile, Goblins. The other two Goblins chased after the five mechs of Charlie Company that managed to penetrate the base whose lone defender was a Zeus piloted by the Militia’s Commander Colonel Mitch Freeman. Shots were exchanged everywhere without anything significant to report.


Turn 9:
 When turn 9 started, it looked bad for the LC as their Command mech lost initiative and became surround by four mechs while the fifth continued to damage buildings in the base. They sluged it out with fists, weapons and kicks, but no one went down. Meanwhile a pitched battle began to develop around Charlie Companies’ Command lance and one mech (Cicada) from the BCL which has come down out of the hills to cause chaos. It charges the Scorpion line while the rest of the BLC repositions on the bluffs. And still the best tanks in the region are sitting most of the battle on the left flank out of the battle.
Turn 10:
In turn 10, the LC’s Command mech, while still surrounded, managed to take out two Legion mechs (Jenner and Assassin) by, of all things, destroying their gyros (never seen it in all my years of playing Battletech, two mechs going down because of gyro hits let alone in one turn). Nevertheless, the DC units got the best of the Zeus by causing quite a bit of internal damage which will make him retreat the following turn. This turn of events left a moderately damaged Phoenix Hawk, an unscathed Clint, and a much damaged Jenner nearly alone in the LC’s base to cause as much havoc as they liked. Though a couple infantry rifle platoons showed up and managed to knock over the remaining Jenner only further damaging one of their own buildings. In the river valley, Charlie Companies’ lightly damaged Command lance, minus one of the Panthers which retreated due to a gyro hit and the very lightly damaged Whitworth which jumped up the cliff side to join the BCL, managed to jump out of the kill box created by the tanks and mechs of the LC and began to close on the base. This action left the LC one target—the Cicada. It tried to run away but just about every LC unit left fired on it and brought it down by hollowing out its torso giving the LC one more point for three in this round. Also occurring this round was the announcement that the LC’s Hatchetemn had to retreat because the incessant indirect LRM fire had finally taken its first victim.


Conclusion:
After ten turns, I asked everyone to give me their opinions on how they thought the next few turns would play out and whether or not they wanted to continue as our time allotted for the table was drawing to a close. I’m sure I could have stayed on the table for a couple more hours, but I did not want people to miss any later games they may have scheduled and dinner was right around the corner. The score at this point was Draconis Carbine 6 to Lyran Commonwealth 8.
After ten turns, I asked everyone to give me their opinions on how they thought the next few turns would play out and whether or not they wanted to continue as our time allotted for the table was drawing to a close. I’m sure I could have stayed on the table for a couple more hours, but I did not want people to miss any later games they may have scheduled and dinner was right around the corner. The score at this point was Draconis Carbine 6 to Lyran Commonwealth 8.
There seemed to be a consensus that ultimately the DC team would win because they still had significant undamaged mechs left. While the LC team had all of their tanks and three mech left, but all of them were moderately to heavily damaged. We surmised that the Catapult and Panther would join the mechs in the base and continue destroying it, they would have to begin fighting LC assets as they rolled or walked in, but those forces would be already damaged and ultimately destroyed. This would especially be true when the remaining four lightly damaged mechs in the central hills felt they could come out and engage the LC forces from the rear—catching the LC forces in a vice. The casualties would rack up fast causing the LC to retreat the rest of their force giving the DC 5 more points. In the final battle, I could imagine the DC player taking out what was easy to destroy while doing their best to avoid the AC20s of the Demolishers (both tanks undamaged when we ended) If the DC team could have gotten the LC team down to six units, they would have had to retreat. Just about everyone thought this was possible considering most of the remaining DC mechs were long range capable and the LC units were a mixed bag. Finally the base was almost destroyed, it would not have taken too much more to finish it off earning the DC player three more points. So there you have it. I think it was much more balanced with the tweaks made and the only reason the LC lost (besides throwing in the towel) is because they allowed the DC units to get in the base by not bringing their heavy tanks into the battle. Even with the DC win, it was only a tactical win, so in other words not by much.
The Rest of the Trip:

In the morning, we packed up and got going, but on my way out, I spent our Kublabucks (coupons you get for winning sanctioned games) on a game about the Spanish Civil War called Popular Front. I also bought two squads of Quar and the Songs of Our Ancestors rule book signed by Josh Qualtieri who adapted the rules from the Ganesha games Flying Lead/Song of Blades and Sequoia Blankenship who illustrated the book. I can’t wait to play it as I was pretty impressed with the rules and figures. Lastly, because I want to move on to other projects, I dropped off the Skondia game board at one of my favorite game shops in Sacramento—Great Escape Games. I know it will be well taken care of and played on by countless players for dozens of games in the coming years. I also want to thank every one of my blog followers who have given me lots of encouragement and feedback as I worked on the Skondia project for the last year. I can’t wait to get started on another. I already have some ideas, but as this post is super long, I’ll bid you adieu.


Great wrap up of a great weekend. Jason undersold how amazing his game looked and was praised. There was only one game board that was clearly better, and jason was at the next level with maybe two other games. Many, many people commented as such. Finally, the heavy armor was a non factor, as it has been in nearly every test game, just once I would have liked to see what those Rhodes AC20s could do.
ReplyDeleteThank you Dylan, I appreciate the comment and the help running the game. I agree with you, regarding the Demolishers. By the third round, I wanted to shout, get those things into the action! They are your best units! However, I wanted the players to come to that conclusion themselves, and I did not want to interfere with the game tactically.
ReplyDeleteWell done AAR. Love the pictures and the summary. The terrain is amazing! Very well done all around!
ReplyDelete